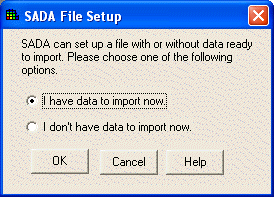
At the SADA File Setup window, select "I have data to import now" and press OK.
Note: SADA accepts a valid comma delimited ascii text file or a Microsoft Access Office file containing appropriate sampling information to establish a SADA file.
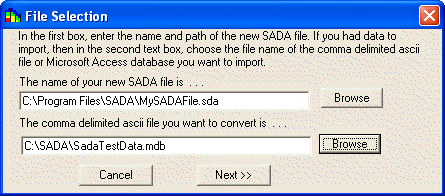
SADA opens the File Selection window. At this point, enter the name of your new SADA file into the first textbox. Then, enter the name of the comma-delimited ascii file or Access database that contains your data SADA into the second textbox (or press the Browse button to select). Press Next>> for SADA to convert your data file into this new SADA file. Note: the external file itself is not affected by the conversion process.
If your input file is an Access database, the following window will appear.
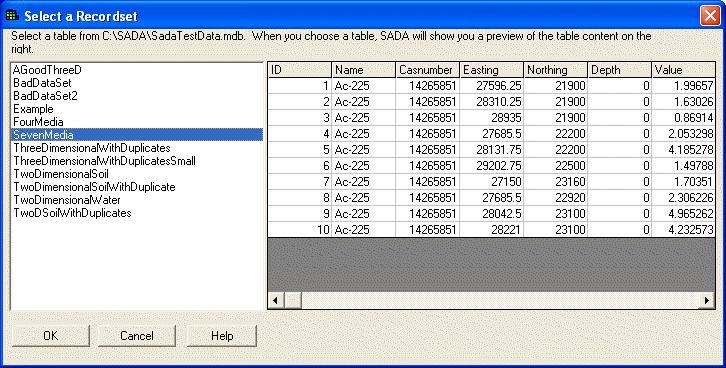
The pane on the left shows all the available tables in your database. Select the table with the needed information and press OK.
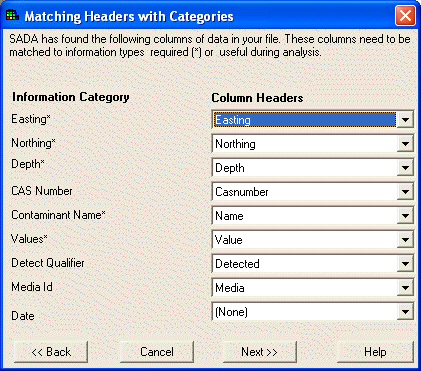
The next step in the process, or the first step if your dataset is a .csv file, is to identify the columns of information in the ascii data file and match these columns of information to information categories that are required or may be useful in SADA. SADA scans the text file for column headers and applies default matches to these information categories. The results are shown in the Matching Headers with Categories window. If a column is mismatched with an information category type, then you can select a new column header by pressing the down arrows and highlighting the new column header.
Required information categories are followed by an (*) and must be assigned to a column in the ascii data file. A category is not assigned if the (none) option is selected in the drop down box. The Depth category is required only when data exist at varying depths. If the Detect Qualifier is not assigned, the data are assumed to be all detects. If the media column is not assigned, SADA adds an artificial media column titled ‘Basic’.
WARNING:
If Media ID, which denotes the type of media the contaminants are sampled in (e.g. soil or groundwater) is not defined, then the human health risk and/or ecological risk modules cannot be setup later. The media is a critical information category to the risk modules. Also, SADA expects certain units for measured values in the risk modules. See Data Requirements.
After the columns have been set, press Next>>. SADA begins the conversion process and presents the data is it will be imported into the Data Editor.
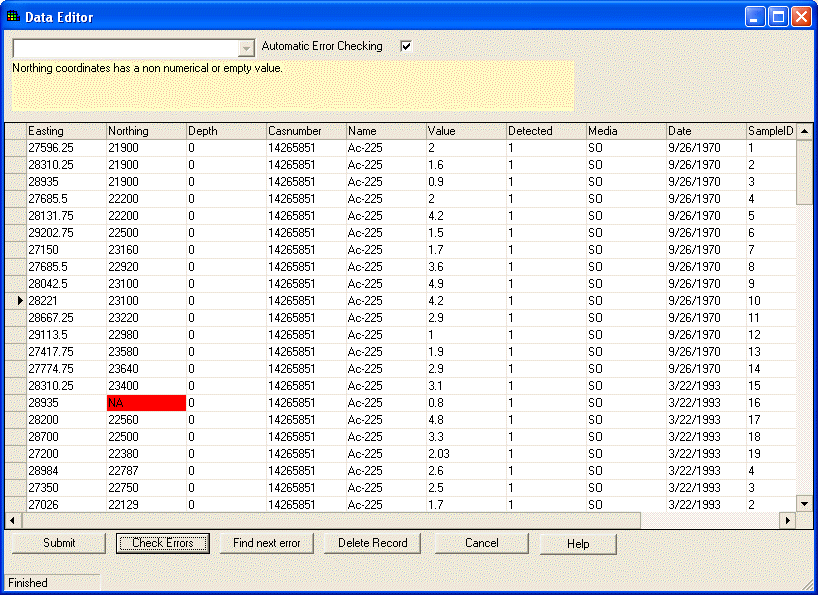
The Data Editor is a simple spreadsheet that shows how SADA views the data as it's being imported. It provides the user a chance to identify errors in the data set and correct them during the import process. At this point, the Data Editor is very simple in functionality and is designed to correct minor errors in the data. If for some reason the data import appears to be largely different than the user intended, the exact cause should be identified outside of SADA and the setup repeated.
SADA highlights cells with red if they contain an unacceptable value for SADA. In the example above, the northing column contains a value of NA. Since SADA requires numerical values for every northing entry, the cell is now red. To determine the exact error, place the mouse over the red cell and the yellow text box near the top explains the problem with the entry.
Once the spreadsheet contains no red cells, the process may continue. Near the top is a checkbox called Automatic Error Checking. It is recommended that this box remain checked. When unchecked, SADA is no longer looking for mistakes as you type. Under these conditions, you must press the Check Errors button at the bottom of the page to run the check. It may be preferable to uncheck the Automatic Error Checking box and use Check Errors later when the user is entering or pasting large amounts of data and does not wish the process to be slowed by SADA checking values as they are entered. However, generally during the import process it should remain checked. If there are many errors or the file is large, use the Find Next Error button for SADA to locate the next error.
After scanning in the contaminants, SADA checks for duplicate values. Duplicate values are resolved based on the criteria defined on for the data query parameters, visible when See the data is selected from the Steps Window.
Click Submit after all errors have been corrected. The SADA file is now successfully created and is automatically opened.